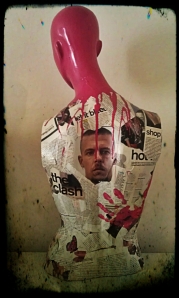
After being M.I.A. for a while, I thought I’d introduce a new category of blog and start sharing a few of the things that have been keeping me occupied lately (MANY more to come so stay tuned!). Scroll down for more info on these cute “d.i. WHY!?” projects.
Agalmatophiliacs need NOT read on-
I happen to live next to the garment district in Downtown LA so obtaining mannequin parts wasn’t too tuff, but if you’re interested in creating a jewelry display that will house all of your necklaces, no matter their length, try checking local antique stores and store closing/liquidation sales to find them cheap in any area.
I went through a giant stack of old magazines and ripped a lot of type and any great, bright images that spoke to me and went to town on a 32oz. bottle of Matte Mod Podge. You might want to consider glossy vs. matte depending on the other elements you use. I also had semi-gloss pink paint and since magazine paper is glossy by nature, the natte worked perfectly for both projects.
After most of that had dried, I took “Shelly” outside and slowly poured paint straight from the can onto the top of her head. You may need grab from the base and tilt her so that the paint is evenly distributed under the chin and gives a nice drip effect as shown above. For added effect try painting make-up on a male or female mannequin a la Tim Curry as Dr. Frank-N-Furter in the Rocky Horror Picture Show.
I was doing a ‘Closet Cleanout’ for a client a while back and the woman was hoarding over 50 old designer shoeboxes. Not only was this a COMPLETE waste of space in her closet but in her garbage too! It got me to thinking about how to reuse and recycle these things that so many people would normally just throw out. Plus, after trying to shop for cheap storage in my office, I found most of the selection to be ridiculously overpriced and/or really boring. So I decided to splurge on fine Japanese and Indian paper sheets from a local gift shop in a matching color scheme, picked up a large roll of solid matte wrapping paper to balance my budget and got to work.
First, I made sure I had enough paper to do each box, since the fine paper I purchased is only sold in one sheet size. I then used a sponge to distribute a thin layer of mod podge (you can use a ruler to grate out any bubbles if you put too much on) all over and wrapped the top and bottom of each box just like a present so each end looked finished. I let everything dry seperately outside before closing the boxes. Now I’m thinking I’ll label each box with some scrapbooking supplies for easy access and VOILA!


